How to Draw Environment Diagrams
EnvDraw
EnvDraw is a cool program that you can run on your class account to help you draw environment diagrams. To use it:
- Type
envdrawinto a terminal. (If this doesn't work, first SSH into torus, and then type the command.) This command should then open an STk interpreter. - At the interpreter, type
(envdraw). - You should see a new EnvDraw window open. At the
EnvDraw>prompt, try defining thesquarefunction. Then, look at the EnvDraw window and see what happens!
Overview
Now you're going to start drawing your own environment diagrams! We'll start from the basics and gradually build on them. Literally all of the rules you need to draw these diagrams are in the previous section. Make sure you know all of them by the time you're done with this lesson.
All of the example environment diagrams we show you in this section are taken from the EnvDraw program.
Define
Let's start by defining a variable in Scheme and looking at the corresponding environment diagram. Specifically, we'll try drawing the diagram for:
(define x
3)
The first step is to always draw the global environment. Make sure to label
it! Next, we need to figure out how to handle the define. By looking at the
rules in the previous section, you should learn that define adds a new
binding to the current frame. Let's draw it out:
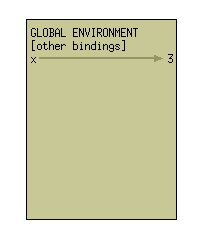
That's all there is to it! Simply write "x" with an arrow pointing to 3, all within the global environment. (Note: you don't have to write "[other bindings]" in your own environment diagrams for this class. EnvDraw does this for completeness.)
Now we're going to move onto defining procedures. What happens when you type the following code into a STk interpreter? We'll continue off of our diagram from earlier.
(define (square x) (* x x))
The first thing we're going to do is change the above code so it uses a lambda:
(define square (lambda (x) (* x x)))
Notice that this expression now has all of the same basic parts as (define x
3). So we follow the exact same procedure: write "square" in the global frame
and draw an arrow pointing to the lambda. We draw a lambda as a double-bubble.
The first bubble points to the arguments and the body. The second bubble
points to the defining environment, or the current environment at the time the
lambda is seen. This is how your diagram should now look.
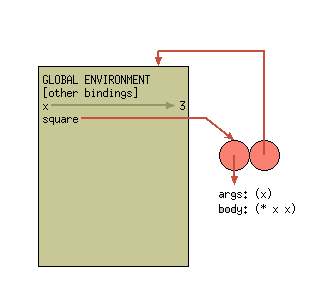
Now you're done! To recap, you first need to draw the lambda. Make the first bubble point to the args and body, and the second point to the defining environment. Next, simply write "square" in the global environment and make it point to the lambda.
In the next section, we'll cover how to actually call the square function we
just defined.
There is one very important point we're ignoring in these examples: define
doesn't always add things to the global environment. Instead, it adds it to
the current frame (which happens to be the global environment in the cases
above). We'll walk you through how to figure out what the current frame is in
a later section.
Applying Primitive Procedures
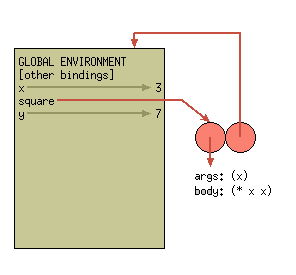
Now, let's draw the environment diagram for:
(define y (+ 3 4))
The difference from the previous example is that we must first apply the +
procedure to 3 and 4 before we can assign the value of y. You can assume that all primitive procedures are applied by magic. Nothing needs to be drawn out for them. Thus, the full environment diagram would simply look like:
Applying User-Defined Procedures
Let's say we now want to actually call the square function we defined earlier.
We'll call it with the code:
(square 5)
To call a user-defined procedure, we follow the following steps:
- Create a frame with the formal parameters of the procedure bound to the actual argument values.

- Extend the procedure's defining environment with this new frame.

- Evaluate the procedure body, using the new frame as the current frame.
The last step doesn't actually involve changing the environment diagram.
Instead, this is when we finally find the value of the call. To evaluate the
body of square, we must first figure out the value of x. We always use the
first available binding for a variable. This means we look at the binding of
x -> 5 in our current frame, rather than the binding of x -> 3 in the global
frame. Once we've figured out the value of x, we multiply it to itself
(remember, you can just assume this is done by magic). And now we're done!
We've multiplied 5 by itself, yielding the answer of 25.
Remember, only compound procedure invocation creates a new frame!
Atomic Expressions
The trick to evaluating atomic expressions (such as finding the value of a symbol) relies on figuring out which frame is the current frame. Before we get into that, remember that the rules of evaluating atomic expressions are:
- Numbers, strings, #t, and #f are self-evaluating.
- If the expression is a symbol, find the first available binding. (That is, look in the current frame; if not found there, look in the frame "behind" the current frame; and so on until the global frame is reached.)
All of the hard work is in case 2 above. Recall our environment diagram from the last section:
Remember that a new frame is only drawn when invoking a user-defined procedure. Thus, the current frame can only differ from the global environment when you are within the scope of another function. While this is a super important point, don't sweat it too much for now. Make sure you understand all of the examples thus far. We'll introduce more complicated examples further in the lesson.
Recall that our environment diagram so far looks like this:
If I now type x into the interpreter, what will its value be?
I now improperly define the function
cube as follows:
(define (cube x) (* y y y))Draw the resulting environment diagram from evaluating the code:
(cube 2)Freeloading Frames
At this point, our environment diagram now has three frames, the global frame, E1, and E2. E1 and E2 were created by calls to square and cube, respectively. However, once these functions return (or finish), the frames E1 and E2 we've created are useless! They are no longer reachable and their bindings no longer matter.
This isn't always the case. In the next sections we'll go over some code that makes these frames useful much after the initial procedure call.
Using set!
Now let's look at how to handle set!. You may recall that set! changes the
first available binding. Remember that we find the first available binding
by looking in the current frame, and then looking in the frames "behind" that
frame.
Let's try it out! Starting fresh, draw the environment diagram that corresponds to the following lines of code:
(define x 3)
(define (change x n)
  (set! x n))
(change x 5)
What is the value of
x?
How can you fix the
change procedure so the value of x in the global environment changes? Indicate ALL possible fixes.
Using let
Using let tends to cause a lot of students trouble. But don't despair! Whenever you're having troubles with let, remember these simple rules:
- Convert the
letinto a lambda statement plus invocation.
For example, you can rewrite
(let ((x 7)
      (y 10))
    (+ x y))
as
((lambda (x y) (+ x y)) 7 10)
- Draw the corresponding
lambda. Remember, alambdais just a double-bubble with the correct arrows. - Call the
lambdawith the proper arguments. Remember, this includes drawing a new frame and binding the formal parameters to the actual argument values.
If you can remember these simple rules, you'll have no trouble at all!
Draw the environment diagram for the following code:
(let ((x 7)
      ( y 10))
    (+ x y))
Now let's try something more complex. Draw the resulting environment diagram for the following code:
(define (make-withdraw initial-amount)
    (let ((balance initial-amount))
        (lambda (amount)
            (if (>= balance amount)
                (begin (set! balance (- balance amount))
                       balance)
                "Insufficient funds"))))
(define W1 (make-withdraw 100))
(W1 50)
Takeaways
At this point, you know everything you need to draw any environment diagram, no matter how complicated! As we go through problems in the future, don't forget the basics! Even the most complicated pieces of code can be boiled down into simple rules.
If there is even a single thing covered so far that you don't understand, ask for help! Environment diagrams is one of those topics that a lot of students find difficult.
What's Next?
Using our new-found knowledge of the environment model of evaluation, in the next section we're going to walk through how to implement OOP by clever-ly using lambdas and lets.
For the Quiz
When you are taking Quiz 8, you are allowed to have a copy of the Environment Diagram Rules in addition to your double-sided cheat-sheet.