Project 2 - Turtle Graphics
Introduction
In Lesson 4, we explored how cons lets us build arbitrarily complicated list structures.
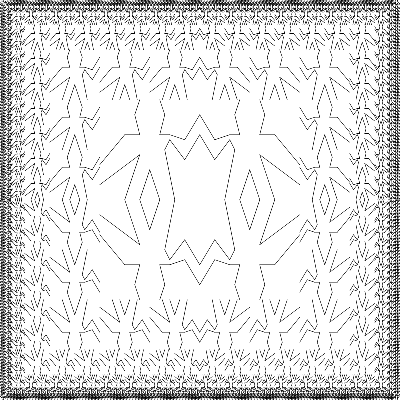
In this project, we'll create a simple picture language that will allow us to build arbitrarily complicated drawings, like the one shown below. Notice how the image is composed of repeated elements that are shifted and scaled.
As we explore this picture language, we'll see how data abstractions and higher-order procedures can be combined to build simple elements into a complex system.
To begin, copy the file ~cs61as/lib/picture.rkt to your directory, or download it
here. You'll also need to install the Racket package
that will enable us to draw pictures. If you're working on a lab computer, type the following into your terminal:
install-htdp
If you want to install the picture-drawing package on your own computer, check out the first followup discussion to this Piazza post.
After completing installation, you should be able to type (require graphics/turtles) into Racket without errors.
The Picture Language
When we began our study of programming in Lesson 1, we emphasized the importance of describing a language by focusing on the language's primitives, its means of combination, and its means of abstraction. We'll follow that framework here.
Part of the elegance of this picture language is that there is only one kind
of element, called a painter. A painter draws an image that is shifted and
scaled to fit within a designated parallelogram-shaped frame. For example,
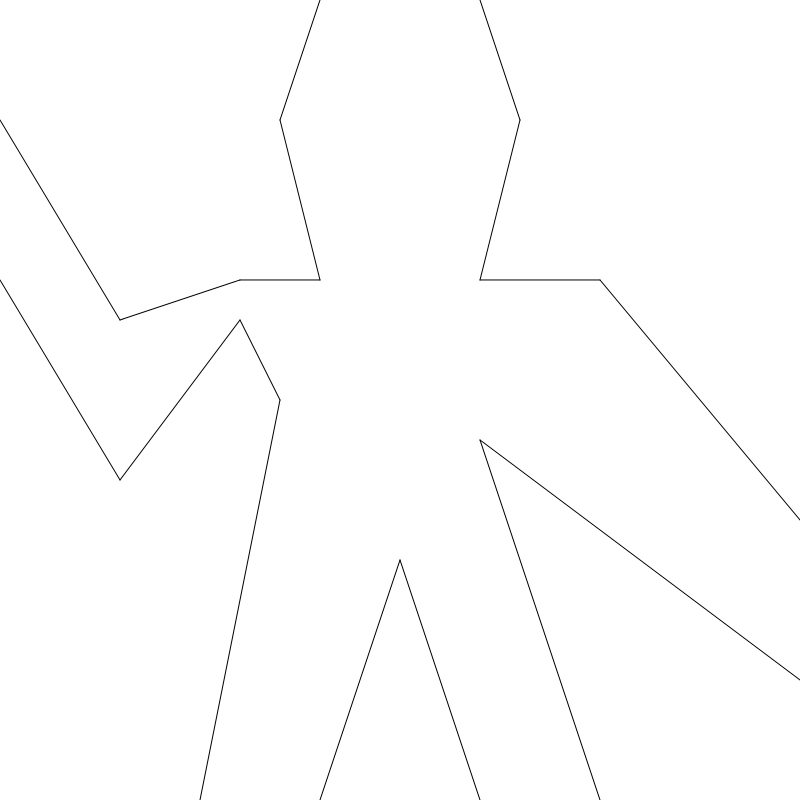
there's a primitive painter we'll call wave-painter that makes a crude line drawing,
as shown below. The actual shape of the drawing depends on the frame—all
four images below are produced by the same wave-painter, but
with respect to four different frames.


Combining Painters
To combine images, we use various operations that construct new painters from
given painters. For example, the beside operation takes two painters and
produces a new, compound painter that draws the first painter's image in the
left half of the frame and the second painter's image in the right half of the
frame. Similarly, below takes two painters and produces a compound painter
that draws the first painter's image below the second painter's image.
Some operations transform a single painter to produce a new painter. For example,
flip-vert takes a painter and produces a painter that draws its image upside-down,
and flip-horiz produces a painter that draws the original painter's
image left-to-right reversed.
Here's how we can define a painter called wave4 that is built up in
two stages starting from wave-painter:
(define wave2 (beside wave-painter (flip-vert wave-painter)))
(define wave4 (below wave2 wave2))
The resulting figures are shown below:


Abstract Operations
Once we can combine painters, we would like to be able to abstract typical
patterns of combining painters. We will implement the painter operations as
Racket procedures. This means that we don't need a special abstraction
mechanism in the picture language: since the means of combination are ordinary
Racket procedures, we automatically have the capability to do anything with
painter operations that we can do with procedures. For example, we can
abstract the pattern in wave4 as
(define (flipped-pairs painter)
  (let ((painter2 (beside painter (flip-vert painter))))
    (below painter2 painter2)))
and define wave4 as an instance of this pattern:
(define wave4 (flipped-pairs wave))
Recursive Operations
We can also define recursive operations. Here's one called right-split
that makes painters split and branch towards the right:
(define (right-split painter n)
  (if (= n 0)
      painter
      (let ((smaller (right-split painter (- n 1))))
        (beside painter (below smaller smaller)))))
Here's what the general template for (right-split painter n) looks like:

And here's the result for (right-split wave-painter 4):

We can produce balanced patterns by branching upwards as well as towards the right:
(define (corner-split painter n)
  (if (= n 0)
      painter
      (let ((up (up-split painter (- n 1)))
            (right (right-split painter (- n 1))))
        (let ((top-left (beside up up))
              (bottom-right (below right right))
              (corner (corner-split painter (- n 1))))
          (beside (below painter top-left)
                  (below bottom-right corner))))))
Here's the general template for (corner-split painter n):

And here's the result for (corner-split wave-painter 4):

By placing four copies of a corner-split appropriately, we obtain a pattern
called square-limit:
(define (square-limit painter n)
  (let ((quarter (corner-split painter n)))
    (let ((half (beside (flip-horiz quarter) quarter)))
      (below (flip-vert half) half))))
The very first figure at the top of this page, reproduced below, is the visual
output for (square-limit wave-painter 5):
Before Starting Exercise 1
First of all, if you skimmed or skipped everything above because you wanted to jump directly to the first exercise, take a minute now to read everything above carefully. It's important!
Also, note that you will not be able to test the visual output of any of your code until after Exercise 6. The picture language we've been describing is incomplete—you'll have to fill in the gaps before we can begin using it!
Exercise 1: up-split
Define the procedure up-split used by corner-split. It is similar to
right-split, except that it switches the roles of below and beside.
For your convenience, right-split is shown again here:
(define (right-split painter n)
  (if (= n 0)
      painter
      (let ((smaller (right-split painter (- n 1))))
        (beside painter (below smaller smaller)))))
Higher-Order Operations
In addition to abstracting patterns of combining painters, we can work at a higher level, abstracting patterns of combining painter operations. That is, we can view the painter operations as elements to manipulate and can write means of combination for these elements—procedures that take painter operations as arguments and create new painter operations.
For example, flipped-pairs and square-limit each arrange four copies of a
painter's image in a square pattern; they differ only in how they orient the
copies. One way to abstract this pattern of painter combination is with the
following procedure, which takes four one-argument painter operations and
produces a painter operation that transforms a given painter with those four
operations and arranges the results in a square. tl, tr, bl, and br
are the transformations to apply to the top left copy, the top right copy, the
bottom left copy, and the bottom right copy, respectively.
(define (square-of-four tl tr bl br)
  (lambda (painter)
    (let ((top (beside (tl painter) (tr painter)))
          (bottom (beside (bl painter) (br painter))))
      (below bottom top))))
Then flipped-pairs can be defined in terms of square-of-four as follows:
(define (flipped-pairs painter)
  (let ((combine4 (square-of-four identity flip-vert
                                  identity flip-vert)))
    (combine4 painter)))
Similarly, square-limit can be expressed as:
(define (square-limit painter n)
  (let ((combine4 (square-of-four flip-horiz identity
                                  rotate180 flip-vert)))
    (combine4 (corner-split painter n))))
Exercise 2: split
right-split and up-split can be expressed as instances of a general
splitting operation. Define a procedure split with the property that
evaluating
(define right-split (split beside below))
(define up-split (split below beside))
produces procedures right-split and up-split with the same behaviors as
the ones already defined.
Frames
Before we can show how to implement painters and their means of combination, we must first consider frames. A frame can be described by three vectors—an origin vector and two edge vectors. The origin vector specifies the offset of the frame's origin from some absolute origin in the plane, and the edge vectors specify the offsets of the frame's corners from its origin. If the edges are perpendicular, the frame will be rectangular. Otherwise the frame will be a more general parallelogram.
The figure below shows a frame and its associated vectors. In accordance with data
abstraction, we need not be specific yet about how frames are represented in Racket,
other than to say that there is a constructor make-frame, which takes three
vectors and produces a frame, and three corresponding selectors: origin-frame,
edge1-frame, and edge2-frame

We will use coordinates in the unit square to specify vectors; that is, we'll use the region of space where [mathjaxinline]0 \leq x,y \leq 1[/mathjaxinline].
Frame Coordinates (Optional)
This optional subsection describes how frame coordinates are calculated.
With each frame, we associate a coordinate map, which is used to shift and scale images to fit the frame. The coordinate map transforms vectors in the unit square to vectors in the frame using the formula

where [mathjaxinline]x[/mathjaxinline] and [mathjaxinline]y[/mathjaxinline] are the components of the input vector.
For example, the vector (0, 0) is mapped to the origin of the frame, (1, 1) to the vertex diagonally opposite the origin, and (0.5, 0.5) to the center of the frame.
In Racket, we can create a frame's coordinate map with the following procedure:
(define (frame-coord-map frame)
  (lambda (v)
    (add-vect
     (origin-frame frame)
     (add-vect (scale-vect (xcor-vect v)
                           (edge1-frame frame))
               (scale-vect (ycor-vect v)
                           (edge2-frame frame))))))
Observe that applying frame-coord-map to a frame returns a procedure that,
given a vector, returns a vector. If the argument vector is in the unit
square, the result vector will be in the frame. For example,
((frame-coord-map a-frame) (make-vect 0 0))
returns the same vector as
(origin-frame a-frame)
because the vector (0, 0) maps to the origin of the frame.
Exercise 3: Representing Vectors
A two-dimensional vector [mathjaxinline]v[/mathjaxinline] running from the origin to a point can be
represented as a pair consisting of an x-coordinate and a y-coordinate.
Implement a data abstraction for vectors by giving a constructor make-vect
and corresponding selectors xcor-vect and ycor-vect.
Then, in terms of your selectors and constructor,
implement procedures add-vect, sub-vect, and scale-vect that perform
vector addition, vector subtraction,
and vector multiplication by a scalar:
Exercise 4: Representing Frames
We will now implement frames as described above.
Here are two possible constructors for frames:
(define (make-frame origin edge1 edge2)
  (list origin edge1 edge2))

(define (make-frame-2 origin edge1 edge2)
  (cons origin (cons edge1 edge2)))
For each constructor, supply the appropriate selectors.
Representing Painters
A painter is represented as a procedure that, given a frame as an argument, draws
a particular image shifted and scaled to fit the frame. That is to say, if p
is a painter and f is a frame, we produce p's image in f by calling (p f).
The details of how primitive painters are implemented depend on the particular
characteristics of the graphics system and the type of image to be drawn. For
instance, suppose we have a procedure draw-line that draws a line on the
screen between two specified points. Then we can create painters for line
drawings, such as the wave painter, from lists of line segments
as follows:
(define (segments->painter segment-list)
  (lambda (frame)
    (for-each
     (lambda (segment)
       (draw-line
        ((frame-coord-map frame) (start-segment segment))
        ((frame-coord-map frame) (end-segment segment))))
     segment-list)))
The line segments are given using coordinates with respect to the unit square. For each segment in the list, the painter transforms the segment endpoints with the frame coordinate map (see above) and draws a line between the transformed points.
Representing painters as procedures erects a powerful abstraction barrier in the picture language. We can create and intermix all sorts of primitive painters, based on a variety of graphics capabilities. The details of their implementation do not matter. Any procedure can serve as a painter, provided that it takes a frame as argument and draws something scaled to fit the frame.
Exercise 5: Representing Segments
A directed line segment in the plane can be represented as a pair of vectors—the
vector running from the origin to the start-point of the segment, and
the vector running from the origin to the end-point of the segment. Use your
vector representation from above to
define a representation for segments with constructor make-segment and
selectors start-segment and end-segment.
Exercise 6: Primitive Painters
Use segments->painter to define the following primitive painters:
x-painter, which draws an "X" by connecting opposite corners of the frame.outline-painter, which draws the outline of the designated frame.diamond-painter, which draws a diamond shape by connecting the midpoints of the sides of the frame.wave-painter, which draws the familiar "wave" figure shown here. Your drawing does not have to be a perfect replica; just make sure it clearly resembles the original wave figure.
To make sure you're on the right track, you should test your code immediately after defining x-painter.
Instructions are below in the "Testing" section.
Important Hint
Remember that segments->painter takes in a list of segments, each of which is comprised of vectors defined relative to the unit square. For example, your code might looks something like this:
(define diag-painter
  (segments->painter
   (list (make-segment (make-vect 1 0) (make-vect 0 1)))))
This draws a single diagonal line from the upper left corner to the lower right corner (like this).
Testing
We can now begin testing our code. Note that the following commands will not work over SSH.
First load picture.rkt by typing in your terminal:
racket -it picture.rkt
Now use the cs ("clear screen") procedure to open the drawing window:
(cs)
You should see a window appear with a small triangle.
You can now tell a painter to draw in the drawing window by using full-frame as the frame argument.
For example, try this:
(x-painter full-frame)
You should see an X appear in your drawing window. If nothing appears, or if you get errors, don't worry. Use the debugging skills you've learned so far to pinpoint the error and resolve it. If you need help, post on Piazza or contact a TA.
Note that the painter tranformations mentioned above (like beside and square-of-four) will not work at this point.
You'll have to finish Exercise 8 before testing them. For now, if your four primitive painters work, move on to the next section.
Transforming and Combining painters
An operation on painters (such as flip-vert or beside) works by creating a
painter that invokes the original painters with respect to frames derived from
the argument frame. Thus, for example, flip-vert doesn't have to know how a
painter works in order to flip it—it just has to know how to turn a frame
upside down: the flipped painter just uses the original painter, but in the
inverted frame.
Painter operations are based on the procedure transform-painter, which takes
as arguments a painter and information on how to transform a frame, and
produces a new painter. The transformed painter, when called on a frame,
transforms the frame and calls the original painter on the transformed frame.
The arguments to transform-painter are points (represented as vectors) that
specify the corners of the new frame: When mapped into the frame, the first
point specifies the new frame's origin and the other two specify the ends of
its edge vectors. Thus, arguments within the unit square specify a frame
contained within the original frame.
(define (transform-painter painter origin corner1 corner2)
  (lambda (frame)
    (let ((m (frame-coord-map frame)))
      (let ((new-origin (m origin)))
        (painter
         (make-frame new-origin
                     (sub-vect (m corner1) new-origin)
                     (sub-vect (m corner2) new-origin)))))))
Here's how to flip painter images vertically:
(define (flip-vert painter)
  (transform-painter painter
                     (make-vect 0.0 1.0)   ; new origin
                     (make-vect 1.0 1.0)   ; new end of edge1
                     (make-vect 0.0 0.0))) ; new end of edge2
Using transform-painter, we can easily define new transformations. For
example, we can define a painter that shrinks its image to the upper-right
quarter of the frame it is given:
(define (shrink-to-upper-right painter)
  (transform-painter painter
                     (make-vect 0.5 0.5)
                     (make-vect 1.0 0.5)
                     (make-vect 0.5 1.0)))
Other transformations rotate images counterclockwise by 90 degrees...
(define (rotate90 painter)
  (transform-painter painter
                     (make-vect 1.0 0.0)
                     (make-vect 1.0 1.0)
                     (make-vect 0.0 0.0)))
...or squash images towards the center of the frame:
(define (squash-inwards painter)
  (transform-painter painter
                     (make-vect 0.0 0.0)
                     (make-vect 0.65 0.35)
                     (make-vect 0.35 0.65)))
Frame transformation is also the key to defining means of combining two or
more painters. The beside procedure, for example, takes two painters,
transforms them to paint in the left and right halves of an argument frame
respectively, and produces a new, compound painter. When the compound painter
is given a frame, it calls the first transformed painter to paint in the left
half of the frame and calls the second transformed painter to paint in the
right half of the frame:
(define (beside painter1 painter2)
  (let ((split-point (make-vect 0.5 0.0)))
    (let ((paint-left
           (transform-painter painter1
                              (make-vect 0.0 0.0)
                              split-point
                              (make-vect 0.0 1.0)))
          (paint-right
           (transform-painter painter2
                              split-point
                              (make-vect 1.0 0.0)
                              (make-vect 0.5 1.0))))
      (lambda (frame)
        (paint-left frame)
        (paint-right frame)))))
Observe how the painter data abstraction, and in particular the representation
of painters as procedures, makes beside easy to implement. The beside
procedure need not know anything about the details of the component painters
other than that each painter will draw something in its designated frame.
Exercise 7: flip-horiz and Rotations
Define the transformation flip-horiz, which flips painters horizontally.
Then define rotate180 and rotate270, which rotate painters counterclockwise by
180 degrees and 270 degrees respectively.
Exercise 8: below
Define the below operation for painters. below takes two painters as
arguments. The resulting painter, given a frame, draws with the first painter
in the bottom of the frame and with the second painter in the top. Define
below in two different ways—first by writing a procedure that is analogous
to the beside procedure given above, then in terms of beside and
suitable rotation operations (from the exercise above).
Levels of Language for Robust Design
Our picture language is now complete. Let's take a step back and evaluate.
The picture language exercises some of the critical ideas we've introduced about abstraction with procedures and data. The fundamental data abstractions, painters, are implemented using procedural representations, which enables the language to handle different basic drawing capabilities in a uniform way. The means of combination are also procedures, and this permits us to easily build up complex designs. Finally, all the tools for abstracting procedures are available to us for abstracting means of combination for painters.
We have also obtained a glimpse of another crucial idea about languages and program design. This is the approach of stratified design, the notion that a complex system should be structured as a sequence of levels that are described using a sequence of languages. Each level is constructed by combining parts that are regarded as primitive at that level, and the parts constructed at each level are used as primitives at the next level. The language used at each level of a stratified design has primitives, means of combination, and means of abstraction appropriate to that level of detail.
Stratified design pervades the engineering of complex systems. For example, in computer engineering, resistors and transistors are combined (and described using a language of analog circuits) to produce parts such as and-gates and or-gates, which form the primitives of a language for digital-circuit design. These parts are combined to build processors, bus structures, and memory systems, which are in turn combined to form computers, using languages appropriate to computer architecture. Computers are combined to form distributed systems, using languages appropriate for describing network interconnections, and so on.
Stratified design helps make programs robust—that is, it makes it likely that
small changes in a specification will require correspondingly small changes in
the program. For instance, suppose we wanted to alter the image based on wave-painter.
We could work at the lowest level to change the detailed
appearance of the wave-painter element; we could work at the middle level to change
the way corner-split replicates the wave; or we could work at the highest level
to change how square-limit arranges the four copies of the corner. In
general, each level of a stratified design provides a different vocabulary for
expressing the characteristics of the system, and a different kind of ability
to change it.
Exercise 9: Square Limit
Alter the square limit of the wave painter by working at each of the levels described above. In particular:
- Add some segments to the primitive
wave-painterfrom Exercise 6 (to add a smile, for example). - Change the pattern constructed by
corner-split(for example, by using only one copy of theup-splitandright-splitimages instead of two). - Modify the version of
square-limitthat usessquare-of-fourso as to assemble the corners in a different pattern. (For example, you might make the wave figure look outward from each corner of the square.)
Final Steps
Following the instructions in the "Testing" section above, test the rest of your painters. Be sure to also test all of your painter transformation procedures.
To submit your project, navigate to your project directory in your terminal, then type
submit proj2
Just for Fun: Exporting Drawings
Don't want to lose your masterpiece? Eager to share your creation on Facebook or Instagram? You can now save your drawings as PNG files using the following command:
(export "filename.png")